Monday, April 4, 2016

Substance Painter Stencil

After I Submitted my homework I started to play around the stencil because I wanted to add some picture patterns onto this helmet instead of just keeping it as a solid color model. I browsed all the provided stencil there are, and I wonder if I could make my own stencil - I found out yes I could! (=^0^=) 
I checked the substance youtube tutorial and it says it was simply made in Photoshop as PSD and import it as image (File -> import image into project). I wonder if I could import the image as .psd, or .ai since I like making the pattern in illustrator. It turned out that only certain format can be imported such as PNG, JPEG. But not psd or ai. So I made the stencil image in Illustrator, then save it as PNG, then imported into painter. 


One more thing I found out was when making the stencil:
1) It doesn't matter if it's color or black and white, because after imported into painter, it automatically change it into grey scale. If you want to have colors on it, you have to customize the brush and paint over the stencil. 

2) When making the stencil, make sure the background is BLACK, and stencil image is WHITE! I tried transparent background with white image, or white background with black image, them imported them, it didn't work out. It's like masked out the image itself and when you paint you are painting OUTSIDE of the image shape, but not IN the image shape itself. 

Wrong stencil size ( it was too full filled the frame ).


Wrong stencil background ( the background is actually transparent, in this grey blog is shows grey)


RIGHT DESIGN ( Black background, smaller sized pattern, pattern color white ).


3) When making the stencil, make sure to resize the pattern much smaller than the background. So when imported the image the stencil will be tiled as repeated but there will be distance between each repeated image. If when making the pattern and it's filled the entire background, then there will be no space in between the tiled stencil in painter which makes painting over the shape really difficult.

But basically if I want to add very beautiful and more complicated colored pattern onto the model, I either have to use brush to hand paint them directly on the model, or use stencil shape then paint different colors within the stencil. 

Not sure how customized pattern can work out in Designer. 

Also, seems there is no way to export the 3D viewer as an image!!!! You can only export all the channels into different maps. So in order to have a view shot I have to use the Print screen button.... (=@_@=) Really????? 

I haven't figure out how to make color changes AFTER the stencil paint over is done. I tried different places in the software but doesn't seem like they provide any option to change the color??? Or maybe I should try to add a mask to change the stencil layer itself. I will keep exploring the possibilities. It's really fun! :)

Substance Painter Helmet Paint Over.

For this week I played around the substance painter and find out it's such an amazing tool and it will be the ultimate tool for me to render my future 3D concept art piece. I love how the interface is design so much alike Photoshop especially the Layer area. Substance designer and painter are not very hard to learn, and I have figured out a nice work flow to finish an entire 3D model with Maya, Zbrush and Substance. Comparing with designer, painter is indeed more for artistic use than nodes. However when I was using the painter, my computer got slowed down. In designer I didn't have this problem. Not sure how it will go when rendering a more complicated model in future.


Monday, March 28, 2016

Substance Designer Color Texture Material Design.

So for this week I played around the substance designer graph and made this helmet design. I checked out some inspirations from Helo3 and really liked one character in there that he has the warm golden armor. Wanted to give this helmet a little bit future, sci-fi space look and it also looks like it has gone through battles and worn out for a while.

I fell in love with Substance designer and painter - it really showed me a new way of rethinking about concept art. If say paint in Photoshop contains the most of fine art form, as 2D it really can only bring you to so far. I was resisting 3D before I learned substance was because I couldn't see how 3D could be turned into a piece of beautiful art as 2D would do with those paints. And now I see how substance brings everything into an entire whole new level! Paint over 3D models was fun, but I don't think I will ever go back to it after tried out and learned Substance. It just makes a lot more sense to me to make art this way.

So what's the best way for me to create concept art now? I remember when I was studying in Photography school I had a question about whether shooting photos with film is better or digital cameras are better. My professor told me it really depends on how you want to cook it. And now I know how I'm going to cook my concept art - Substance it is! No more paint over 3D models in Photoshop!


Complete Final Look


Zoom in final look.


Details show the dirt, and the paint wear.


Graph.

I worked on the Base color mostly, used material selector for different part of the helmet, then used paint wear and dirt.


Thursday, March 10, 2016

Prop_Part_02

Maya 3D Model with references:
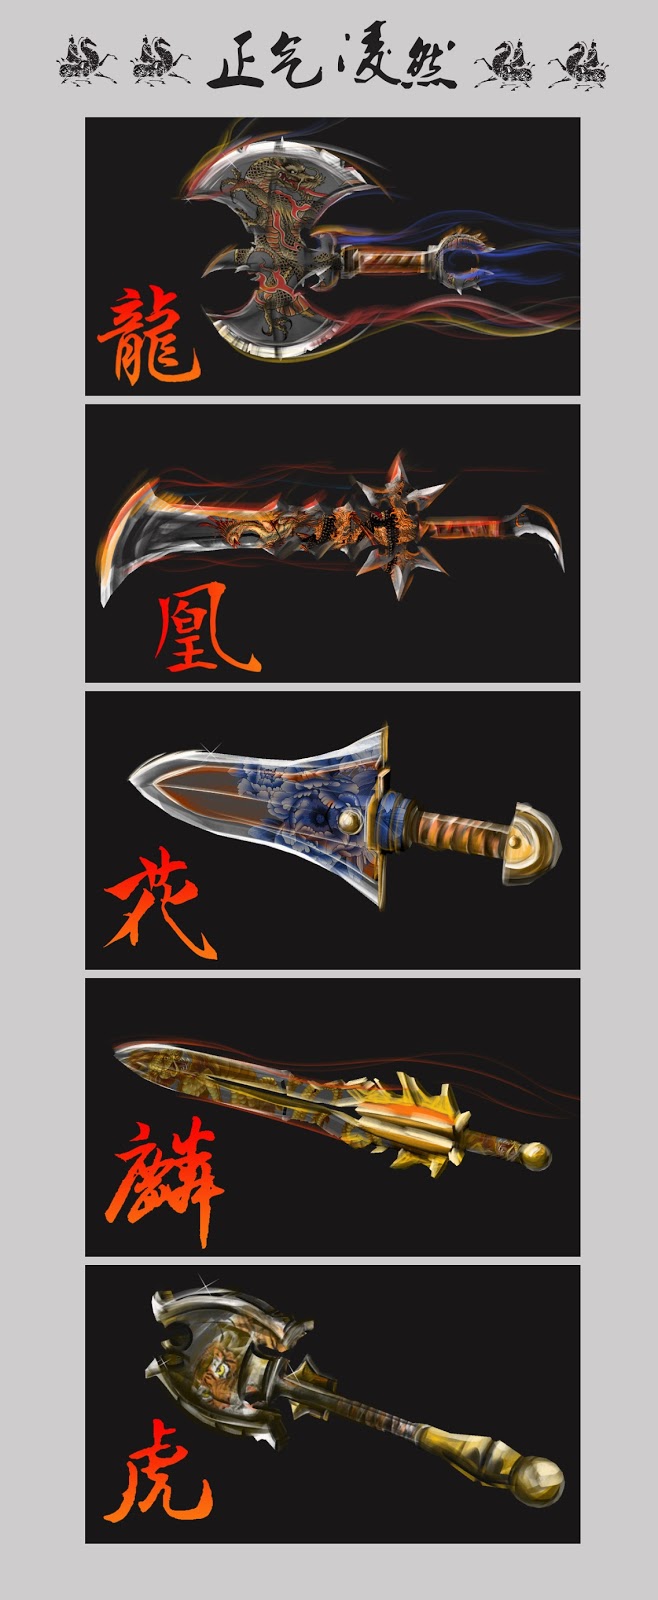
Since Photoguru team was reassigned (oh well, we did our best ) (=*_*=), and I know I'm going to Childnomore, but I'm not sure what my tasks will be, so for this assignment I felt I had freedom to build something I like :P . I decided to make some ancient Chinese sword. This time I tried a little bit more complicated shapes on all weapons modeling. Of course, need some reference to model these things quick. I skipped the very complicated details on original concept art in order to make the shapes quicker so I can paint over them later on. I'm going to use Zbrush to do more complicated shape modeling after this assignment.  


Photoshop ( all flower and animal patterns got from google as quick layout):


Friday, March 4, 2016

Prop 01
Something potentially could be added into capstone game, it's a stone demon head located at a ruin site somewhere. I'm starting to explore how to make human's face and head. In maya, it's certainly not easy. Zbrush is the way to go. The last concept, I went a little bit wild on exploring what could be possible if this stone head also was alive. Add a few textures on it, and painted over a little bit.  


Monday, February 22, 2016

Toon Shader Exploration.

This week, I made five potential props for our capstone game. The theme and all elements in this game will be ancient Greek style. I made some potteries, and some architecture parts so they can be used on the three islands.

My plan is to keep working on these parts in this coming week, to sculpt them in Zbrush, adding more texture details, paint them over using the sample reference shown here in Maya, so we can toss them into UE4 and see if they fit the world. There are still many more parts I want to make, these are the starting point.

Toon shader is fun tool. I can imagine using them on certain style characters for a more cartoonish look. Although I don't see we will use Toon shader in our capstone game, it's certainly a very powerful and handy tool to use in future for quick color and lines mock-up.

1) Architecture Parts_01.

The reference is from the research of ancient Egyptian temple columns ( although our game is mainly ancient Greek style, ancient Egypt and Greek civilization came across and blended into each other at some point in history. So here I chose this reference so in this week I can start to paint Nile flowers onto the columns.)


                                       Prepared the column base for future texture paint over.


2) Architecture Parts_02.

For this one I used the a very typical ancient Greek column top as the build. The use for this one in game is as a destroyed left over part from the previous existed civilizations on Zeus. This week, I'm going to export it into Zbrush, and sculpt all the detail textures as shown on the reference picture.


3)Prop Parts_ Pottery 01.

Destroyed homewares are the must-have elements in our game to show a civilization which used to shrine. My plan is to add some minimum flower sculpted details on the pottery body, but mainly will paint over either using Zbrush poly paint, over paint over the UV by using the reference images paint.   


3)Prop Parts_ Pottery 02.

Although Toon shader is not the first option for our game, I'm very happy about how this one turned out. It's very close to its reference image, and the overall effect almost look like it's painted over by oil. The golden material look is the one I'm looking for as building potteries to show a very luxury life style before the civilization was destroyed on three islands.


3)Prop Parts_ Pottery 02.

I tried both warm red and golden for the previous two and they turned out amazing! So this time I wanted to try to use some cold color. I'm happy with the model shape, but doesn't seems cold color, especially this purple, worked out that well. It may look good underwater, which will add a blue tint and tone over it.


*Note*:

I just realized that this week is just for environment, I made all the props instead. So there are 3 quick mock-up environments for a overall look of destroyed civilization corners on three islands.